
Pattern designed by VioletAndOberon
Warning: this crochet object, no matter how cute it is, is not a toy. It has not been tested for safety. Do not give it to children or pets.
If you don’t know Joseph Bologne, you may wish to start with watching this amazing presentation of his life in English, with animations and epic music.
Copyright information
This pattern or any portion thereof may not be reproduced in any manner whatsoever without the express written permission of the designer.
This pattern is part of a bigger project by VioletAndOberon and Tes Grands Auteurs en Petits Morceaux - TGEPM, aiming at educating by featuring dolls dedicated to composers, writers, painters, and other artists whose life and face are often hidden behind the masterpieces that they created.
I make this pattern available free of charge here, because a considerable number of my followers, subscribers, and viewers come from low-income countries.
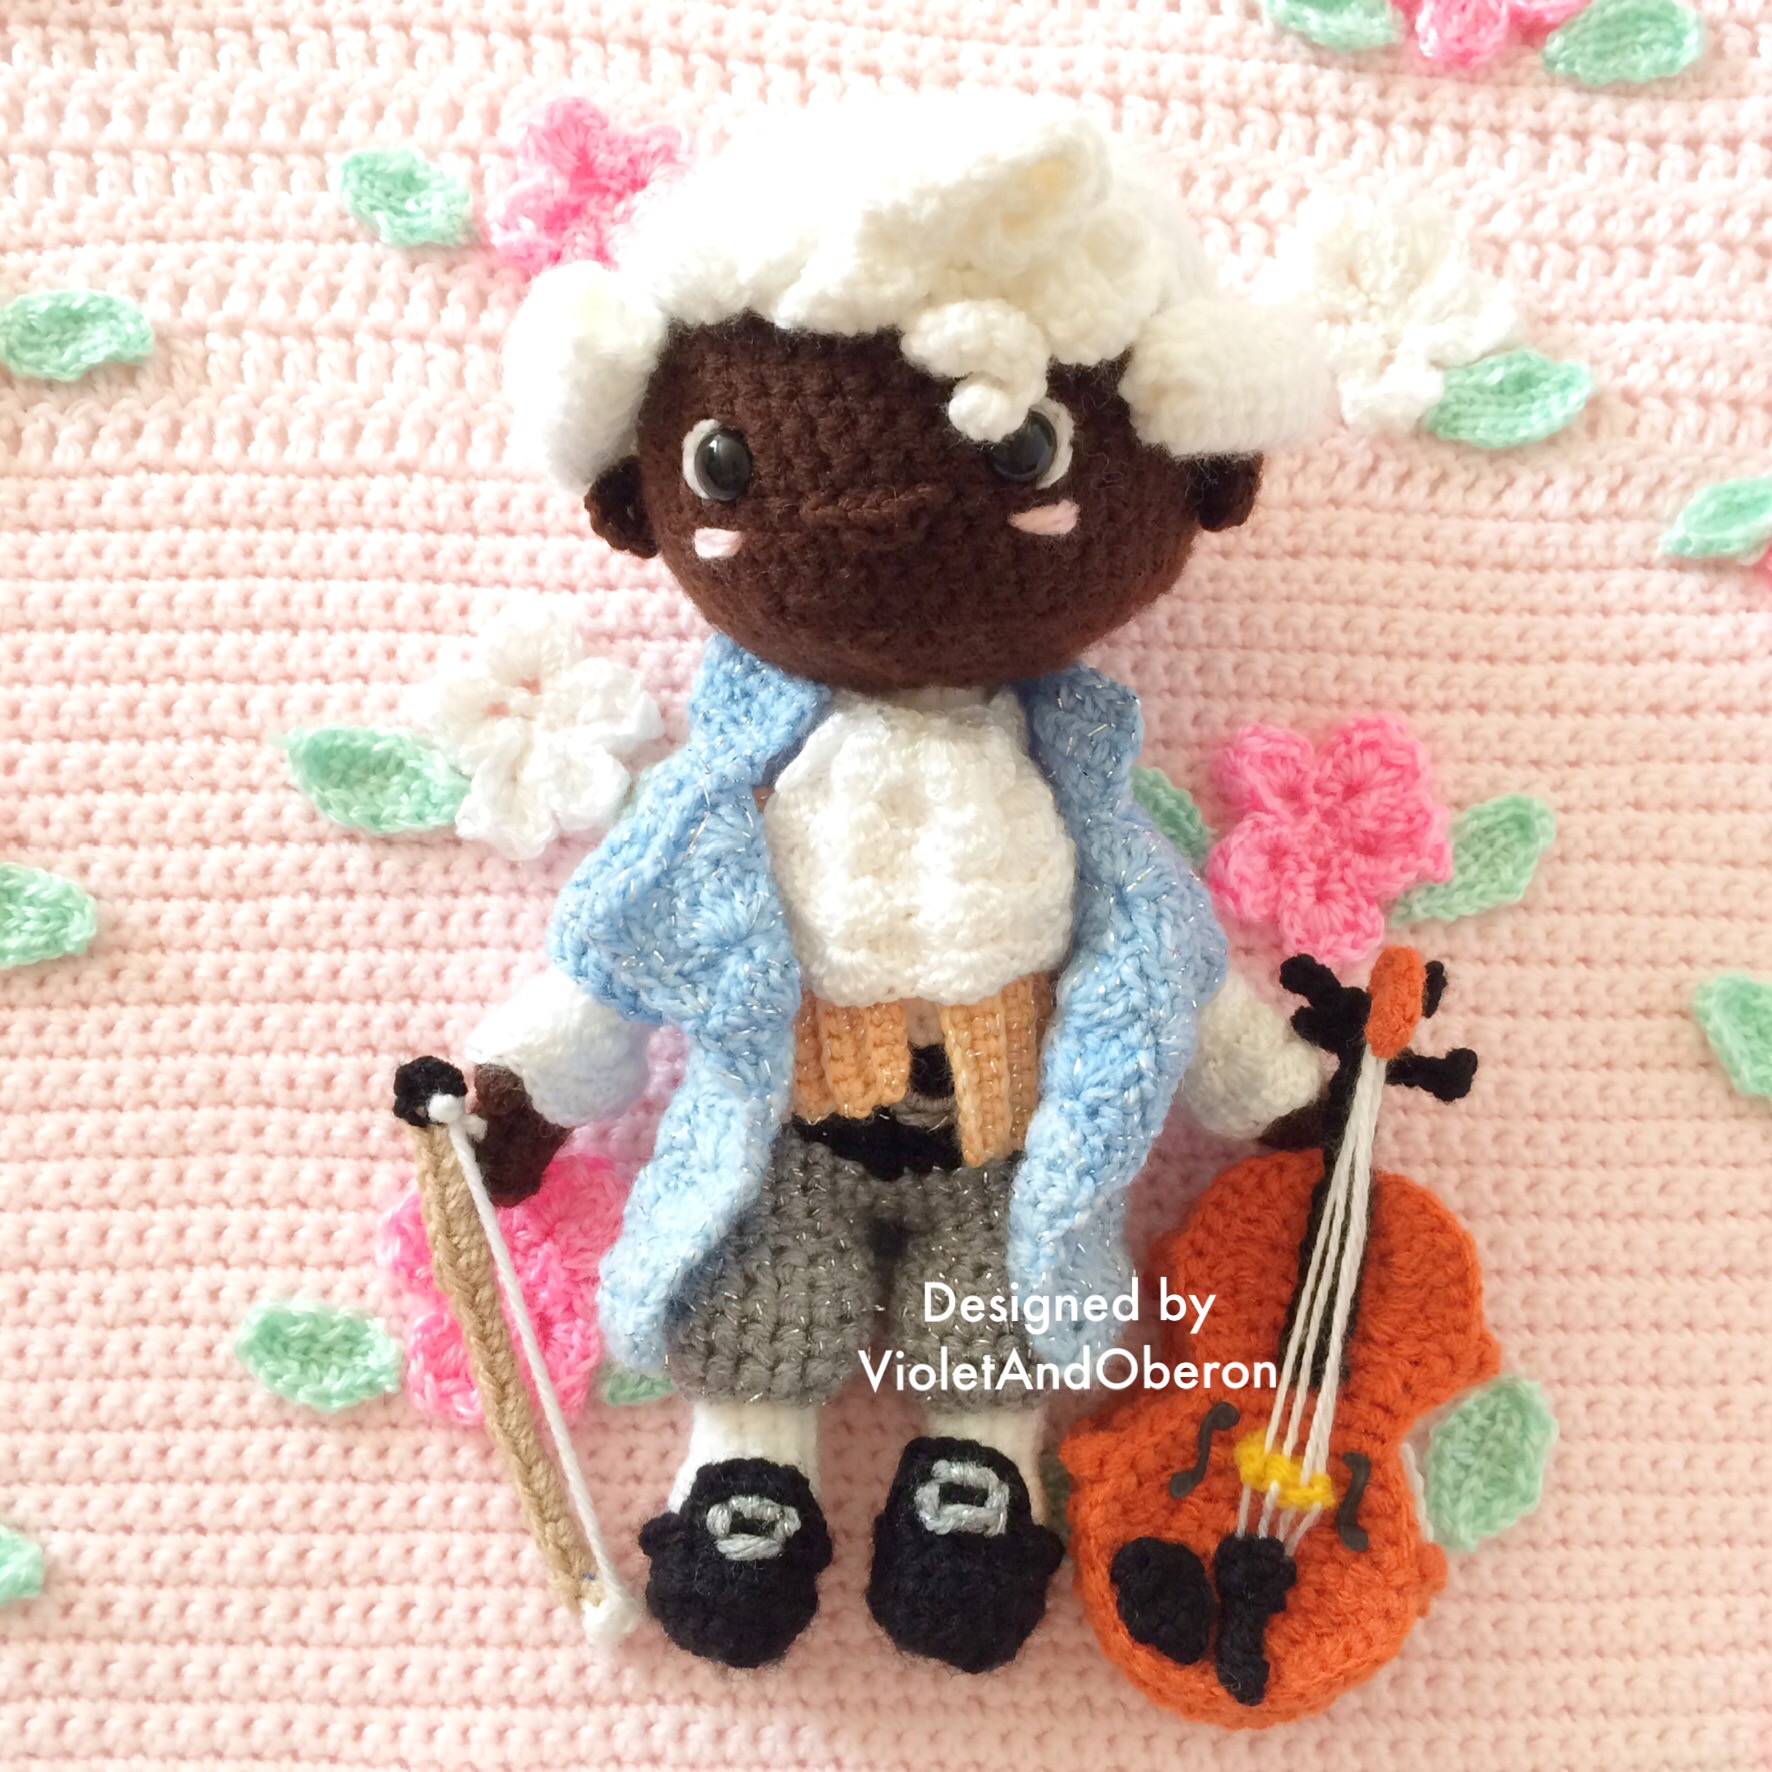
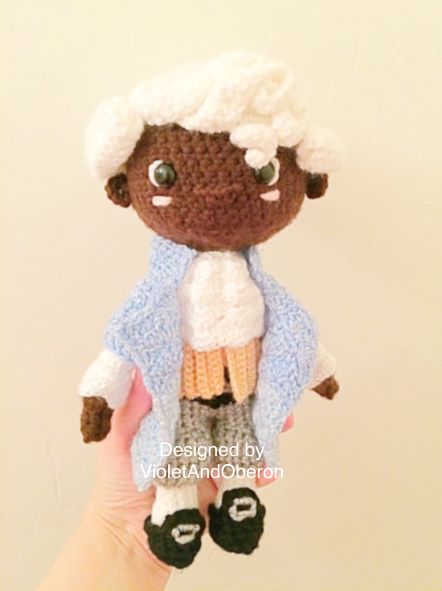
About Joseph Bologne Chevalier de Saint-Georges
Joseph Bologne (1745-1799) was a champion fencer and a virtuoso violinist and conductor. He is the first classical composer of African ancestry. His music and talent were so prodigious that he took Paris by storm. Even though his father was a mere planter in the French colony of Guadeloupe and his mother was a slave, Chevalier de Saint-Georges reached the highest levels of the society of the time. He even became close to Queen Marie-Antoinette and to the Prince of Wales.
If you have been following me for a little while, you know that I have a profound love for his music.
Chevalier de Saint-Georges had to be the first amigurumi of composers that I would design.
It took me a bit of thinking, as I wanted him to look somewhat childlike, endearing, and cute. I first came up with the illustration above, then I aimed at creating it in crochet.
Copyright
This pattern is protected by universal copyright law. Kindly reach out to - contact at violetandoberon dot com - to report illegal activity or obtain special permissions.
You may…
• You may sell the finished items you have made from this pattern. You must provide attribution.
• You may live stream yourself making this item, as long as it is not a tutorial, and as long as you do not share the instructions of the pattern that I designed.
• You may share VioletAndOberon’s pictures, but of the finished item only. You must provide attribution.
You may not…
You may not reproduce any part of this document by any means, except printing for individual use. But you are highly welcome to share the link to this pattern.
• Reproduction by filming is prohibited, except stated above.
• Translating this pattern to repost it is prohibited. Translations by the designer will come in time.
• You may not claim any part of this design as your own.
• Using VioletAndOberon’s own pictures for your marketing purposes is prohibited.
• Of course mass production of items based on this pattern is prohibited.
Pattern information
Basic information
Terminology: USA
Size: 26 cm tall doll, 13 cm long violin
Difficulty: Beginner to Elementary
Yarn weight: Medium 4 acrylic, Between Light 3 and Medium 4 acrylic and metallic, Light 3 acrylic
Supplies
-
2.5 mm hook (for almost all the pieces)
-
2 mm hook (for the lacy pieces)
-
Toy stuffing. I used pillow stuffing.
-
Yarn sewing needle
-
Short and long pins. Feel free to use only standard pins.
-
Scissors
-
Stitch markers
-
1 set of safety eyes
The pattern contains the instructions to crochet:
-
1 doll of Joseph Bologne with his wig on
-
1 jacket
-
1 jabot and cuffs
-
1 violin proportionate to the doll
Depending on what you prefer, you may choose to crochet all the pieces, or to leave some of them out. The doll will look good even without the jacket, jabot and cuffs!
I designed this doll of Joseph Bologne using mostly Bernat Premium and Red Heart Super Saver yarn. I purchase them all at my local Walmart. This is not sponsored. I however suggest you use equivalent yarn in order to achieve similar results.
You may feel like using cotton yarn instead of acrylic for a non fuzzy effect, as often recommended for amigurumi. Rest assured that using acrylic will still give great results!
Yarn used by VioletAndOberon when designing
Colour of the yarn, yarn used, what piece was made with it
White - Bernat Premium white - Wig, torso, arms, socks
White- Luv Baby Easy Knit Yarn 3 Light - Jabot, cuffs, violin strings
Brown - Red Heart Super Saver - Face, hands
Grey - Soft Gray Sparkle Bernat Premium - Trousers, detail on shoes and belt buckle
Black - Bernat Premium black - Belt, shoes, violin pieces
Pastel - Blue Blue Red Heart Roll with it Sparkle “ Cristal” - Jacket
Pastel orange - Orange Red Heart Roll with it Sparkle “Magic” - Waistcoat flaps
Orange - Bernat Premium - Violin
Yellow - Bernat Premium - Small violin piece
Please note that Bernat Premium is like the Super Value but using Premium grade acrylic. It is very soft. I highly recommend it.
Necessary skills
-
Working in rows and in the round (in a spiral)
-
Accurately counting stitches and rows
-
Recognizing the different loops on a stitch
-
Basic crochet stitches
-
Shell stitch - The Shell stitch will be thoroughly explained to make it accessible to beginners
-
Basic sewing
Abbreviations and their translations (work in progress, I hope it helps) English/ French/ Spanish/ German
R: row or round depending on context/ rang ou tour/ hilera-vuelta / Reihe
MR: magic ring/ cercle magique/ anillo/ Runde
Ch: chain/ chaînette/ cadeneta - medio punto/ Luftmasche
SS: slip stitch/ maille coulée/ punto pasado/ Kettmasche
SC: single crochet/ maille serrée/ punto bajo/ Feste Masche
DC: double crochet/ bride/ punto alto/ Stäbchen
HDC: half double crochet/ demi-bride/ medio punto alto/ Halbstäbchen
Triple crochet: / punto alto doble/ Doppelstäbchen
Inc: increase/ augmentation/ aumento/ zunehmen
Dec: decrease/ diminution/ decremento/ abnehmen
IncT: increase with 3 instead of 2 stitches.
(…) X: repeat the instructions for that section by the number of times indicated
Skip: Skip/ passer/ saltar/ überspringen
Rem: remaining
FLO: front loop only/ travail uniquement dans le brin avant/ sólo parte delantera de la cadeneta/ nur vorderes Maschenglied
BLO: back loop only/ travail uniquement dans le brin arrière / sólo parte trasera de la cadeneta/ nur hinteres Maschenglied
The front loop is always the one closest to you. When you turn your working piece, the front loop becomes the back loop, and so forth.
Tension
You will need to keep the same tension throughout the project in order for each piece to fit together.
Do not pull on the yarn after each stitch in an attempt at making your work tighter because it is an amigurumi crochet pattern - if you are using a 2.5 mm hook, it will get tight with your usual tension!
How to use the stitch markers
Stitch markers are there to help you count rows, rounds, identify the first stitch, etc.
Feel free to attribute a color system to your stitches to know what they are used for.
For example:
Green for the first stitch of a row.
Red for every 10, 20, or nth number of stitches.
Blue for identifying the right side from the wrong side.
Stuffing
The pieces should be stuffed as you go. However, be very careful not to overstuff.
Do not stuff the arms much if at all or they will get stuck in a cross-like position.
Do not overstuff the rest of the piece as it might stretch the stitches, deform the doll and show the stuffing.
Safety warning
This crochet creation is not suitable for babies and young children. It is not a toy. It has not been tested for safety.
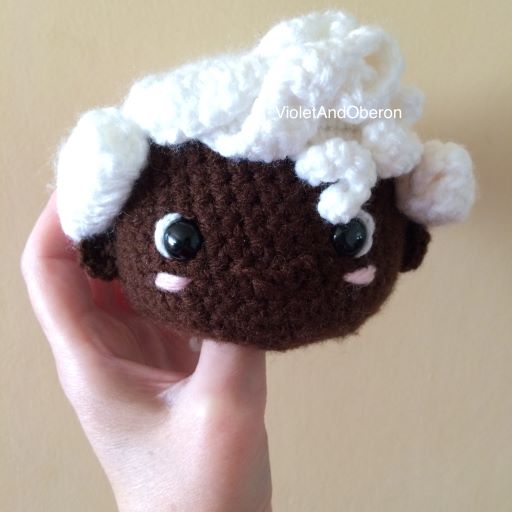
Head
Use a 2.5 mm hook.
Use brown yarn.
You will need 2 stitch markers. One that you will place at the first SC of each round. The other one that you will place when you reach R16 to be able to easily find where to put the safety eyes.
R1 Place the stitch marker on the first SC as you crochet it. 6 SC in MR. (6)
R2 (SC-inc) X6 (12)
R3 (1SC, SC-inc) X6 (18)
R4 (2SC, SC-inc) X6 (24)
R5 (3SC, SC-inc) X6 (30)
R6 (4SC, SC-inc) X6 (36)
R7 (5SC, SC-inc) X6 (42)
R8 (6SC, SC-inc) X6 (48)
R9-19 48SC
Tip:
It’s easy to get confused or lost when you are working several rounds with the same amount of stitches multiple times.
Keep a notebook or a piece of scrap paper to write the number of the round you are working on, and then tick it when you have completed it.
R20 (6SC, SC-dec) X6 (42)
R21 (5SC, SC-dec) X6 (36)
Place the eyes with a width of 6SC between them.
Start stuffing.
R22 (4SC, SC-dec) X6 (30)
R23 (3SC, SC-dec) X6 (24)
R24 (2SC, SC-dec) X6 (18)
R25 (1SC, SC-dec) X6 (12)
Finish stuffing.
SS. Tie off, leaving a 30 cm tail to later sew onto the body.
Ears
R1 6SC in MR
Sew then 6SC apart from the eyes.
Eyes
Sew some white on the exterior side of each eye.
Upper cheeks
Sew some pink or light orange at a distance of 1SC below each eye.
Nose
Sew some brown. Start at a distance of 2SC from the left eye then sew over 4SC. Then sew over the centre 2SC below the 4SC.
You can now set the head aside.
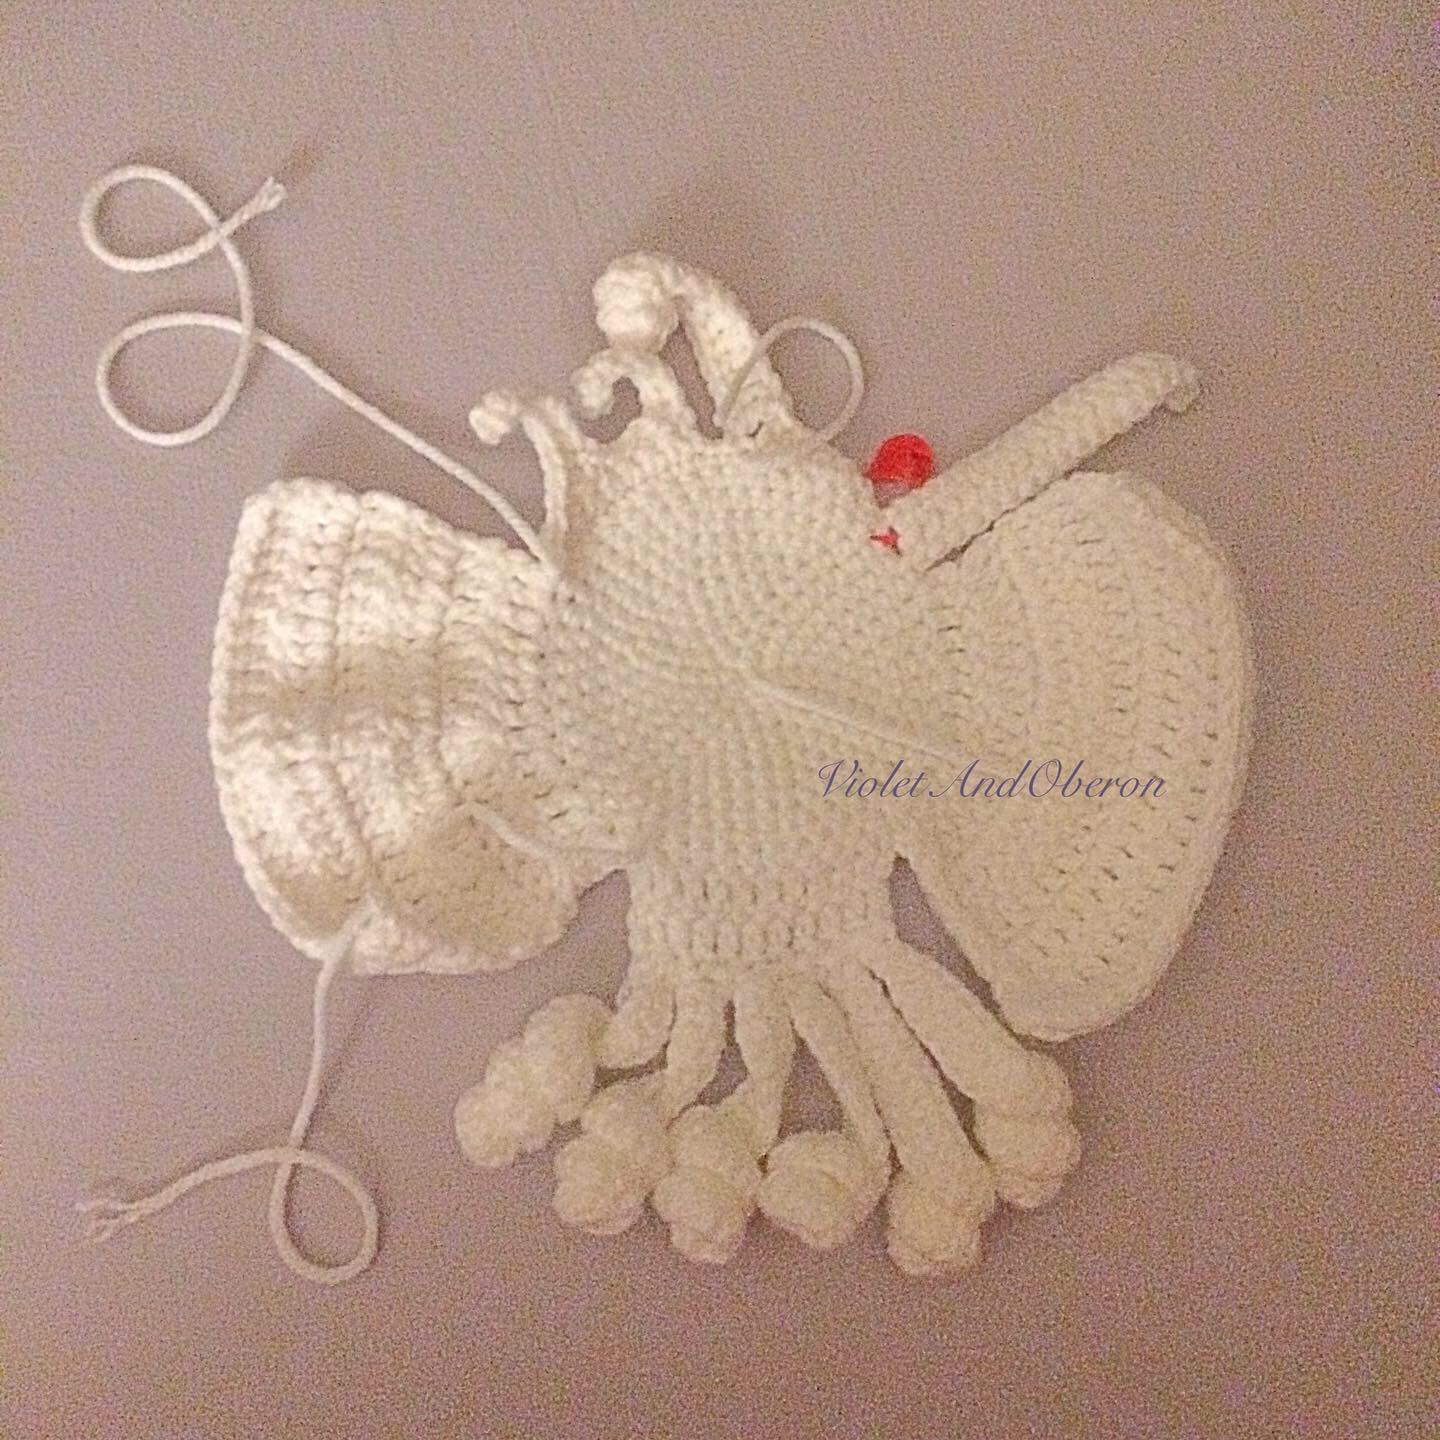
Wig
The wig may look like a complex shape but it is actually quite simple. It starts with a circle, then it is extended in some places. It’s quite nifty.
You will need white yarn.
Use a 2.5 mm hook.
The main part of the wig is worked in the round, the rolls are worked in rows, the strands, and curls are worked by chaining and then slip stitching back to the beginning of the chain.
R1 Place the stitch marker on the first SC as you crochet it. 6 SC in MR. (6)
R2 (SC-inc) X6. (12)
R3 (1SC, SC-inc) X6 (18)
R4 (2SC, SC-inc) X6 (24)
R5 (3SC, SC-inc) X6 (30)
R6 (4SC, SC-inc) X6 (36)
R7 (5SC, SC-inc) X6 (42)
R8 (6SC, SC-inc) X6 (48)
R9-10 48SC
First long fringe strand
R1 Ch20. Starting from the 3rd ch from your hook, 18DC. SS into the 3rd stitch of the main part of the wig.
Other front strands
The other strands will be a bit lower on the forehead.
R11 SC15.
R12 Ch1, turn. SC15.
R13 This is the row from which you will start your strands.
SS, SS then first strand:
Ch16. Starting from the 3rd ch from your hook 14DC.SS into the main part of the wig.
Then second strand:
Ch11. Starting from the 2nd ch from your hook 10SC. SS into the main part of the wig.
Then third strand:
Ch15. Starting from the 2nd ch from your hook 14SC. SS into the main part of the wig.
Because we have just added R11, R12, and R13, you need to SS along the side of these rows to get back to the main part of the wig at R10.
First side roll:
Count 18SC from your Stitch marker. This is where you should start the first side roll.
The rolls start with a basis of 10SC, then more rows are added with increases to get an A-line shape.
R11 10SC.
R12 Ch2, turn. (DC, DC-inc) X4, 2 DC. (14)
R13 Ch2, turn. (2DC, DC-inc) X4, 2DC. (17)
R14 Ch2, turn. (3DC, DC-inc) X4, 1DC. (19)
R15 Ch2, turn. (4DC, DC-inc) X3, 4DC. (21)
R16 Ch2, turn. (5DC, DC-inc) X3, 3DC. (24)
R17 Ch2, turn. 24DC
R18 Ch2, turn. 24DC
R19 Ch1, turn. 24SC
Ch1, tie off.
Ponytail and curls
The back of the wig is made of a ponytail with curls.
R11 10SC.
R12 Ch2, turn, 10DC
R13 Ch2, turn, 10DC
R14 Ch2, turn, 10DC
Ch1, turn, SS.
Now you will create the curls. When I first designed the little Joseph Bologne doll, I made 6 curly strands. Feel free to make more or less by changing where you SS back into R14 at the end of your curly strands.
Curls
Ch 22. Starting from the 3rd ch from your hook. (DC-incT) X10. 5DC, 5HDC.
If you wish you can make shorter or longer curls.
Tie off when you have reached the side of R14.
Second side roll
You will proceed in the same manner as the first side roll.
R11 10SC.
R12 Ch2, turn. (DC, DC-inc) X4, 2 DC. (14)
R13 Ch2, turn. (2DC, DC-inc) X4, 2DC. (17)
R14 Ch2, turn. (3DC, DC-inc) X4, 1DC. (19)
R15 Ch2, turn. (4DC, DC-inc) X3, 4DC. (21)
R16 Ch2, turn. (5DC, DC-inc) X3, 3DC. (24)
R17 Ch2, turn. 24DC
R18 Ch2, turn. 24DC
R19 Ch1, turn. 24SC
Ch1, tie off.
It will be easier to install the wig once the head is attached to the body. Set aside.
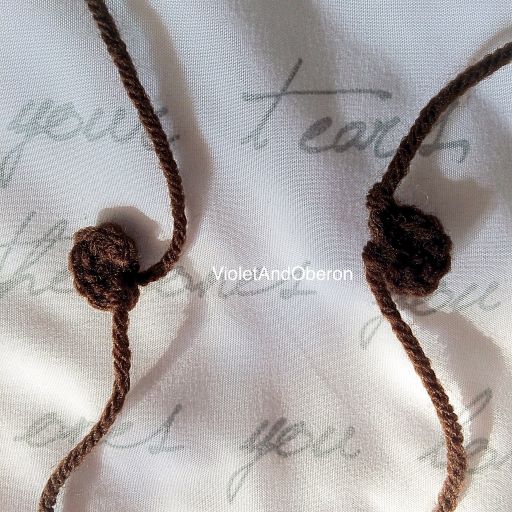
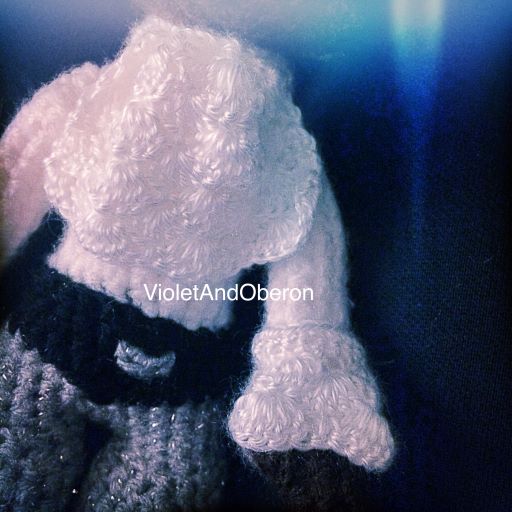
Arms
You will need brown and white yarn.
Use a 2.5 mm hook.
Start with brown.
Make two.
R1 Place the stitch marker on the first SC as you crochet it. 4SC in MR.
R2 (Sc-inc) X2. (8)
R3-4 8SC
R5 7SC, 1 Popcorn stitch made with 4DC
R6-7 8SC
Change to white yarn.
R8-14 8SC.
SS. Tie off, but keep a tail that might be used to sew the armpits if they are a bit too loose.
Do not close the hole. We need the 8SC because we will crochet them with the torso later on.
Use a pencil to push a little bit of filling down to the hand. Put very little in the arm.
Set aside.
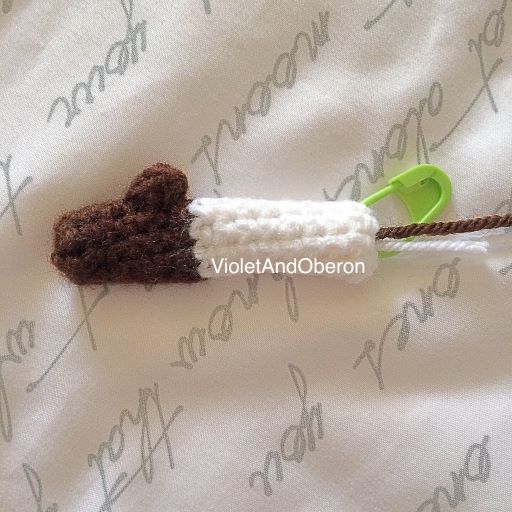
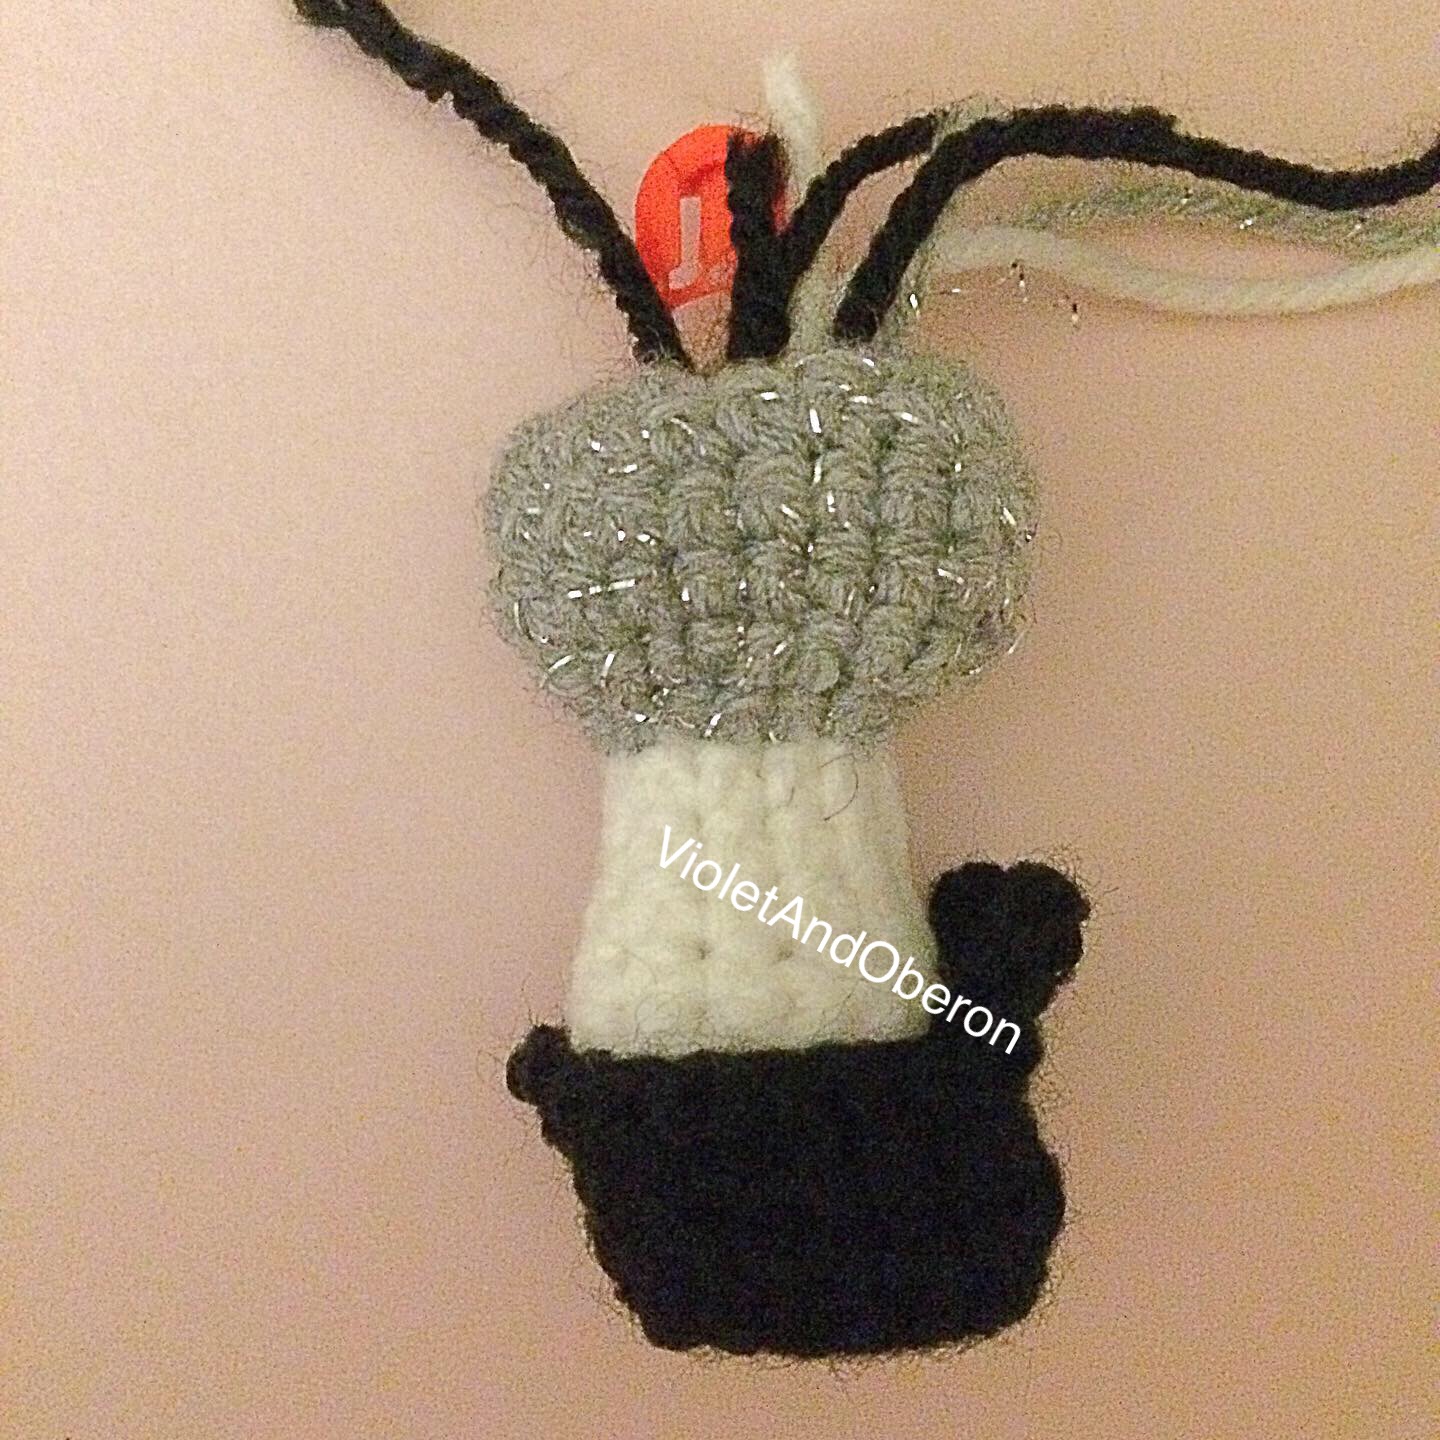
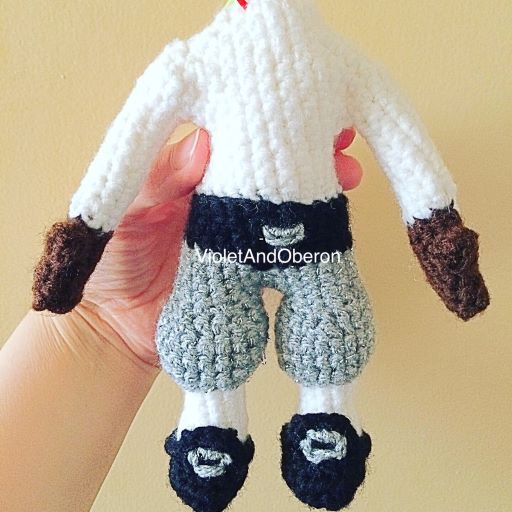
Foot and leg
You will need black, grey, and white yarn.
Use a 2.5 mm hook.
Start with black.
I am very fond of this technique to create little shoes, feet, or boots that are flat and help provide good support for the rest of the doll when you place it vertically.
You will be crocheting the sole of the shoe first which is made with an oval.
Ch6. Start from the 2nd ch from your hook.
R1 4SC, SC-incT, 3SC, SC-inc (12)
R2 SC-inc, 3SC, Sc-inc, Sc, Sc-Inc, 3SC, Sc-Inc, Sc (16)
R3 16BLO-HDC
R4 16SC
Change to white yarn
R5 4FLO-SC, (FLO-SC-dec) X4, 4FLO-SC (12)
R6 12SC
R7(4SC, SC-dec) X2 (10)
R8-10 10SC
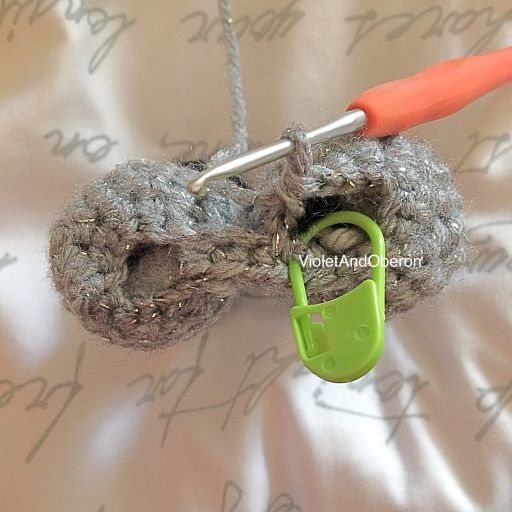
Change to grey
R11 (BLO-SC, BLO-Sc-inc) X5 (15)
R12 (2BLO-SC, BLO-Sc-inc) X5 (20)
R13-14 20BLO-SC
R15 (2BLO-SC, BLO-SC-dec) X5 (15)
R16 (BLO-SC, BLO-SC-dec) X5 (10)
R17 10SC (10)
Tie off. Do not close the hole at the top of the thigh of each leg because we will crochet the abdomen onto it.
Stuff firmly.
Make the shoe adornments before joining the legs together as it is easier.
Shoe adornment
You will need black yarn and grey yarn.
Use a 2 mm hook.
Insert the hook in R4 which is the last black yarn row before the white yarn row.
R1 SC all around. Tie off and cut.
R2 Identify the 4SC at the front of the shoe. Insert hook and SC in each of them.
R3 Ch1, turn, 4SC.
R4 Turn, SS, 2SC, SS. Then SS along the edge back to R1. Tie off. Cut.
Using a yarn needle and sew grey yarn to create a buckle.
By now you should have made the foot and legs, the hand and arms, and the head. If you have skipped some of these pieces, go back and crochet them now as you won’t be able to crochet the body without them.
Upper body
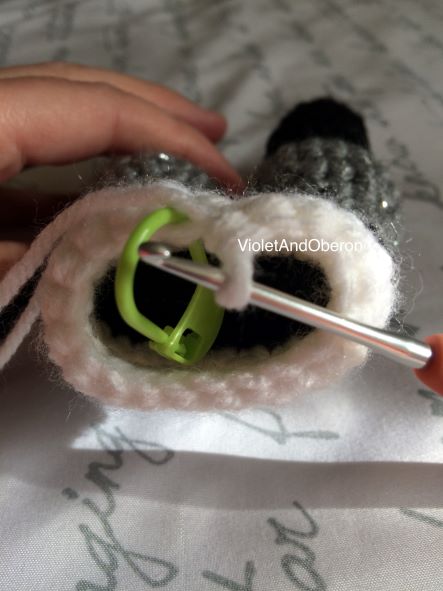
Abdomen
Start with the grey yarn.
Make sure to place the legs with the feet facing the same direction. Make sure that the heels are the parts the closest to you.
You are going to start from the right leg.
Since we are making the crotch, make sure that you are starting from the inner part of the leg.
SS in the right leg.
R1 SC in the right leg. Ch2. SC in the left leg. SC3, SC-inc, SC5 along the left leg. SC2 along the chain. SC in the right leg. SC3, SC-inc, SC3. (25) I am only human, there might be small errors in my counting, please reach out if I need to correct anything in this pattern, thank you.
R2-4 25SC (25)
Change to black.
R5 25SC
R6 25BLO-SC (25)
R7 12BLO-SC, 1BLO-SC-dec, 11BLO-SC (24)
Change to white.
R8 (4SC, SC-dec) X4 (20)
R9-11 20SC
SS. Tie off.
Stuff the thighs and the abdomen quite firmly so that they don’t go all limp when you will put the doll up. But do not overstuff. You need to take the arms now as you will be crocheting them to the torso.
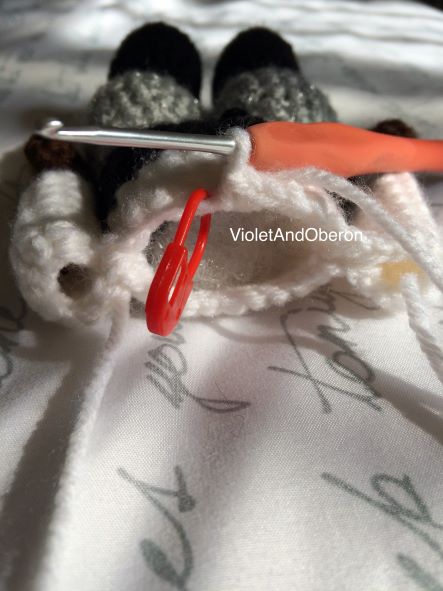
Torso
Make sure that both arms are in the same direction.
Make sure that the thumbs are facing front.
Make sure that the doll is facing front.
You are going to start from the front center of the belly. SS, Ch1, SC in same stitch. Place a stitch Marker.
R1 4SC along the belly. Ch1. 8SC along the left arm. SC in ch. 10SC along the back of the body. Ch1. 8SC along the right arm. SC in ch. 5SC along the belly. (40)
R2 40SC.
R3 4SC, SC-dec, 3SC, SC-dec, 3SC, SC-dec, 8SC, SC-dec, 3SC, SC-dec, 3SC, SC-dec, 4SC. (34)
R4 3SC, SC-dec, 1SC, SC-dec, 1SC, SC-dec, 1SC, SC-dec, 2SC, SC-dec, 2SC, SC-dec, 1SC, SC-dec, 1SC, SC-dec, 1SC, SC-dec, 3SC. (25)
You should stuff since we are reaching the top of the torso and the hole of the neck will become too small to stuff later.
R5 (SC, SC-dec) X8, SC in rem stitch (17)
R6 (2SC, SC-dec) X4, SC in rem stitch (13)
R7 5SC, SC-dec, 5SC (11)
R8 11SC
Do not stuff the neck too much. In order for the head not to bobble, I find it best to put a piece of plastic or wood that acts like a spine from the body to the neck of the doll.
Tie off. Keep tail for sewing head.
Sewing the head
(Pictures and explations to be added soon.)
Installing the wig
As mentioned earlier, it is much easier to install the wig once the head is securely sewed to the body.
Placing it
You are going to start with pinning the wig, as it is, onto the head. Make sure that the centre of the wig matches the centre of the head. Place a long pin.
Place several pins around the crown of the head.
Rolling the side rolls up
Then proceed to roll up the side rolls. For the best results, roll them slightly diagonally so that the roll looks tight on the front and elongated at the back.
You should be able to make the two rolls touch at the back below the pony tail.
Place some pins all along.
Shaping the pony tail
I recommend placing a little bit of stuffing to give some volume at the end of the skull.
Position the curls by stacking their roots together and pin with a long pin.
The strands on the forehead
Place and pin. Make sure to gently roll the tip of each strands. Use the picture for reference.
Once everything is positioned and pinned securely, sew on to the head.
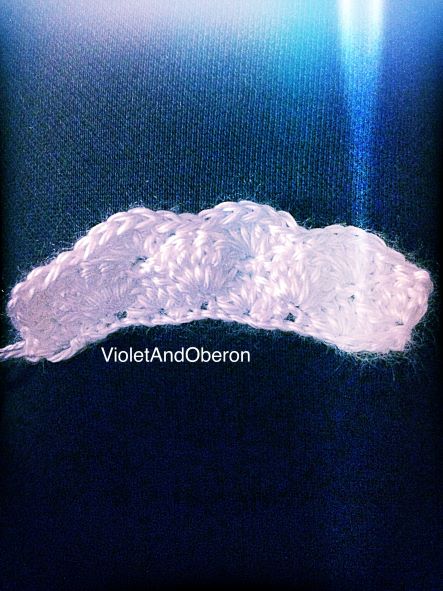
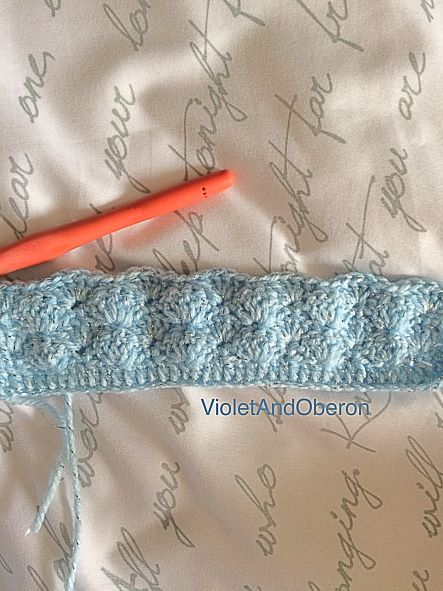
Jabot and cuffs
The jabot and cuffs are rectangles made with shell stitches. The only difference between the jabot and the cuff is the amount of rows.
You will need the light 3 acrylic white yarn.
Use a 2mm hook.
Cuffs
Make two.
R1 Ch23. Starting from the 2nd ch from your hook, (SC, skip 2, 5DC into the next st, skip 2) X3. SC, skip 2, 3DC in the last ch of the row.
R2-5 Ch1, turn. SC into the first DC stitch. 5DC into the next SC stitch. Skip 2. SC into the next DC stitch. 5DC into the next SC stitch. Skip 2 SC into the next DC stitch. 5DC into the next SC stitch. Skip 2 SC into the next DC. Skip 2, 3DC into the last SC.
Sew the two sides of to make a tube.
Place onto the arms at R8 so that it matches the beginning of the white sleeve. Sew.
Jabot
Use the same instructions of the cuffs but make 12 rows.
You need to sew the jabot onto a collar. Use the same yarn as the one for the jabot and the cuffs.
R1 Ch30, Starting from the 2nd ch from your hook 29SC.
R2 Ch1, turn HDC 29.
Place it around the neck of your little Joseph Bologne, and sew to join the two ends.
Sew the Jabot along the collar at the front.
You should now feel comfortable with crocheting shell stitches.
If you wish, you can choose to stop here and not to crochet the coat of the Joseph Bologne amigurumi. He already looks quite dapper and dashing.

Coat
The main part of the coat is made of shell stitches. The collar is made of HDC stitches. The sleeves are made of DC stitches.
R1 Ch43. Starting from the 3rd ch from your hook, 41DC.
R2 Ch1, turn. (SC, skip 2, 5DC into the next st, skip 2) X6. Skip 2, SC, 3DC in the last st of the row.
You should have 6 shells and a half.
R3 Ch1, turn. SC into the first DC st, 5DC into the next SC st. Then (SC into the 3rd DC st of the shell, 5DC into the next SC) X5. Sc into the 3rd DC st of the shell, 3DC into the last st of the row.
R3-R8 Proceed in the same manner R8 included.
Now you are going to work only on one side to create the first front part of the coat. Start with the right . R9-13 Ch1, turn. SC in the first st. 5DC in the SC. SC into the 3rd DC st of the shell. 3DC into the next SC.
Now to the other side to create the second front part of the coat.
R9 You need to crochet on the same side of the piece as you were when doing R9 on the other side of the coat, the left.
Count ten st from the end. SS, Ch1, SC in the same st. DC in the SC. SC into the 3rd DC st of the next shell. 3DC into the last st.
R10-13 Ch1, turn. SC in the first st. 5DC in the next SC. SC into the 3rd DC st of the next shell. 3DC into the next SC.
Now you are going to create the top of the centre back of the coat.
Put your crochet piece on the same side as you did for row 9. R9 SS into the 3rd st of the first free shell. Ch1. SC in the same st. 5DC in the next SC. SC into the 3rd DC st of the next shell. 5DC in the next SC. SC into the 3rd DC st of the next shell. Skip 1. 3DC into the next st.
R10-13 Ch1, turn. 1SC in the same st. 5DC in the next SC. SC into the 3rd DC st of the next shell. 5DC in the next SC. SC into the 3rd DC st of the next shell. 3DC into the last st.
Collar
You are now going to create the collar.
The collar is placed at the top, between the start of each sleeve hole.
You will start from the right side.
R14 SS.Ch1.SC in the same st. Ch6 above the sleeve hole. 15SC along the back piece of the coat. Ch6. SC1 in the left side of the coat.
R15-16 Ch1, HDC all along. (19)
Sleeves
R1 Ch20. Start from the 3rd ch from the hook, 18DC.
R2-3 Ch2, turn, 18DC.
R4 Ch1, turn. SS until the 11th st. Ch2. 6DC.
R5 Ch2, turn. 6DC.
Use the yarn needle to join the two sides of the sleeves from R1 to 3.
Sew the sleeves to the sleeve holes of the coat.
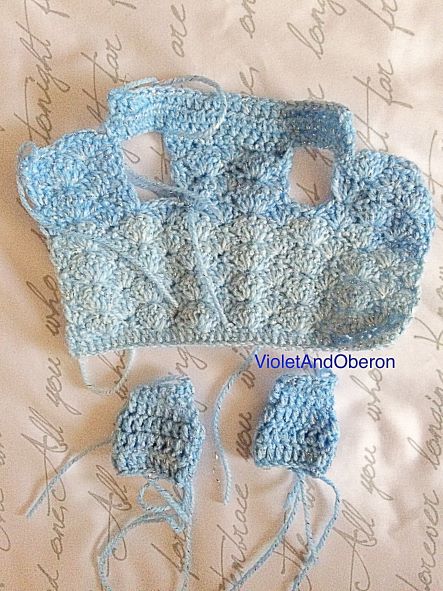
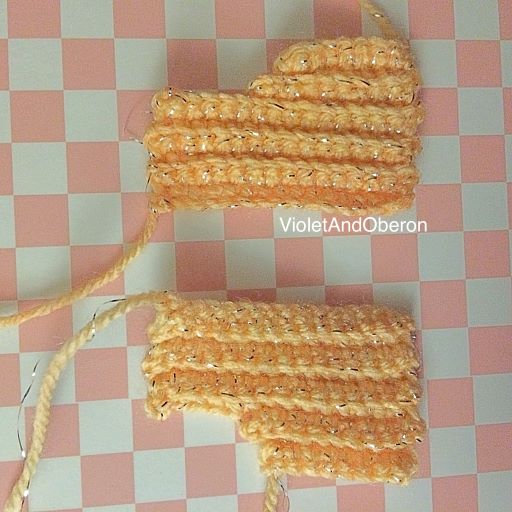
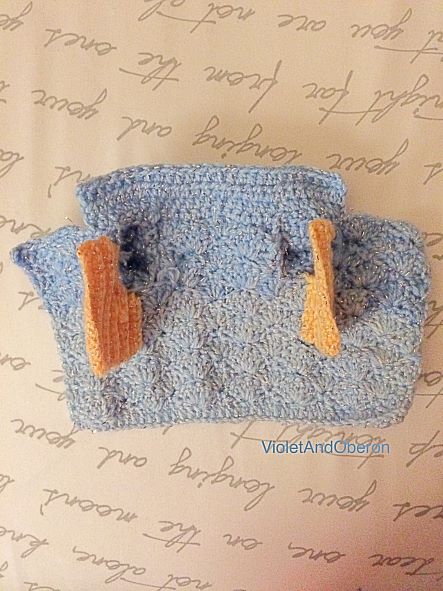
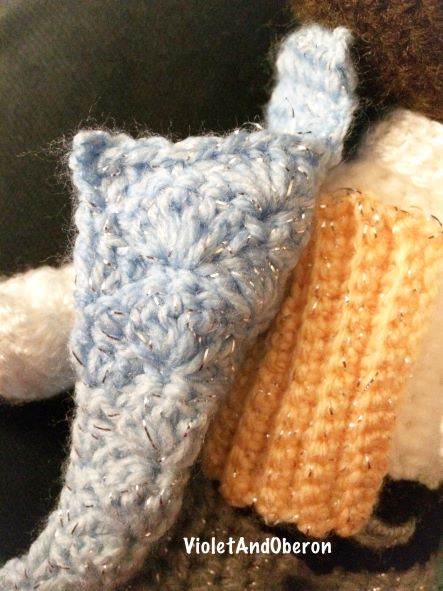
Waistcoat flaps
Instead of making a full waistcoat, you are only going to make the two front flap parts that you will then sew inside the coat.
You will need pastel orange yarn.
Use a 2.5 mm hook.
R1 Ch16. Start from the 2nd ch from the hook, 15SC.
R2-6 Ch1, turn. 15BLO-SC
R7 Ch1, turn. 9SC, SS in next st.
R8 Ch1, turn. SS in the next 9th SC from R7, then 8SC.
R9 Ch1, turn. 7SC. SS in next st.
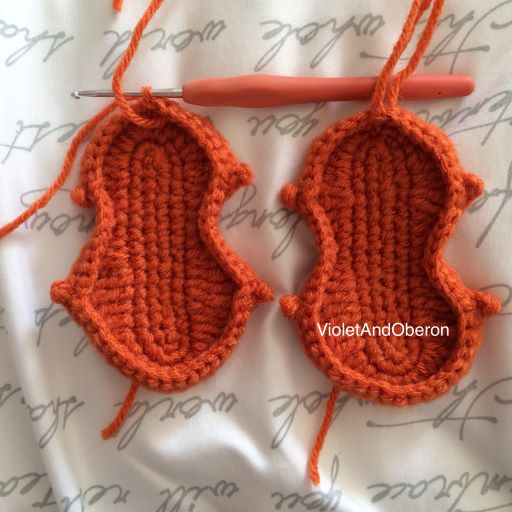
Joseph Bologne’s violin
You are going to crochet all the parts of the violin and then sew them together. It is quite a fun process.
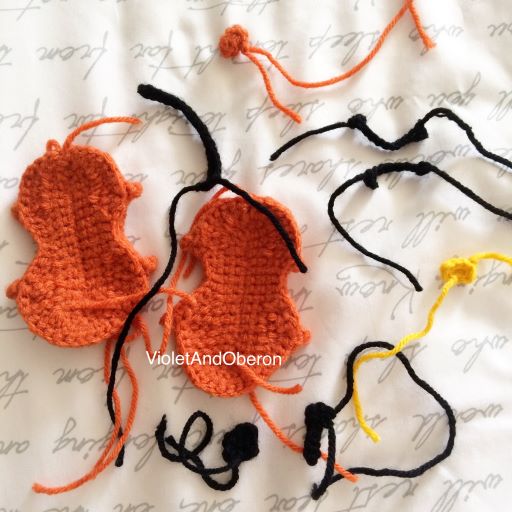
Violin plates
Make two.
The violin top and back plates are each made by doing oval crochet.
You will need orange yarn.
Use a 2.5 mm hook.
R1 Ch16. Starting from the 2nd ch from the hook, SC and place your stitch marker, 13SC, 3SC in the last ch. Continue crocheting on the other side of the ch, 12SC, 2SC in the last ch.
R2 2SC in first SC. Make sure to keep moving you stitch marker on the first SC of each round. 12SC, (SC-inc) x4, 14CS.
R3 Ch1, SS into 1st st. 3HDC in next st. (2DC in next st) X2. 1Triple in next st. (1HDC in next st) X2. (1SC in next st) X3. 2DC in next st. 1Triple in next st. 2Quadruple in next st. 1Triple in next st. (2DC in next st) X2. (1HDC in next st) X2.
1SC in next st. (1HDC in next st) X2. (2DC in next st) X2. 1Triple in next st. 2Quadruple in next st. 1Triple in next st. 2DC in next st. (1SC in next st) X3. (1HDC in next st) X2. 1Triple in next st. (2DC in next st) X2. 2HDC in nesxt st. 1HDC in nex st. 1SC in last st.
R4 8SS. SC in next st, ch2, SS in 1st ch, SS in the SC that you have just made, SS in the st into which you made your SC.
9SS. ch2, SS in 1st ch, SS in the SC that you have just made, SS in the st into which you made your SC.
14SS. ch2, SS in 1st ch, SS in the SC that you have just made, SS in the st into which you made your SC.
9SS. ch2, SS in 1st ch, SS in the SC that you have just made, SS in the st into which you made your SC. 7SC.
R5 Ch1, FLO-SC into the 1st st. 7FLO-SC. ch1. Skip the pointy part. 10FLO-SC. ch1. Skip the pointy part. 15FLO-SC. ch1. Skip the pointy part. 10FLO-SC. ch1. Skip the pointy part. 8FLO-SC.
Violin neck
Ch19. Starting from the 2nd ch from the hook, 9SS, 9SC.
Violin scroll
Ch10. Starting from the 2nd ch from the hook, 9SS.
Sew right at the extremity of the narrowest part of the neck.
Chin rest
R1 Ch4. Starting from the 2nd ch from the hook, 3SC.
R2 Ch1, turn. 3SC
R3 Ch1, turn. Skip 1st st. SC, SS. Then continue on the left edge SS, then 2SC in the last place of the edge.
Tailpiece
Ch6. 4SS. 4SC in last ch.
Sew onto the top plate, right at the centre of the bottom
Bridge
Ch4, starting from the 2nd ch from the hook, 3SC
Pegs
Make two.
Ch3.Starting from the 2nd ch from the hook SS. Ch10. Starting from the 2nd ch from the hook SS.
Sew below the neck.
F-holes
Cut the shape in paper of felt and glue them on.
Strings
Use one long string of thin white yarn. Use a yarn needle.
Sew through the top of the neck. Then through the bridge. Then through the tailpiece. Then back up, back down, back up. And there you go, four strings.
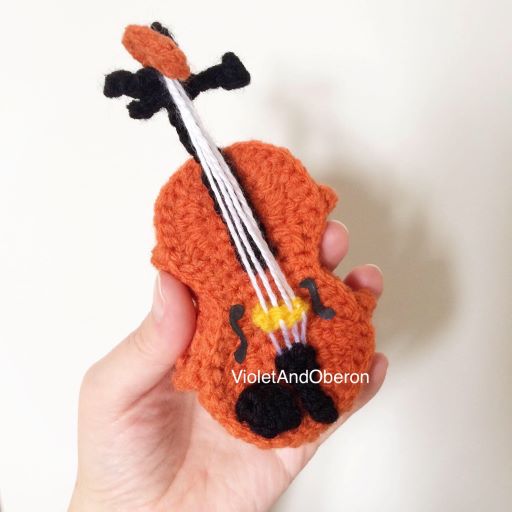
Bow
You may crochet the wooden part of the bow by crocheting around a piece of wire, and then add a white piece of yarn along the two ends.
Other accessories
I will add other accessories to this pattern. Please make sure to bookmark it and come back to see updates.
Et voilà!
Congratulations for completing the amigurumi Joseph Bologne Chevalier de Saint-Georges project. I am so happy for you :)

How to share your beautiful Joseph Bologne amigurumi?
I would love to see your little Joseph Bologne once you have completed it.
Use the Hashtag #VioletAndOberon when sharing your pictures on social media, and kindly credit @VioletAndOberon as the designer :) .