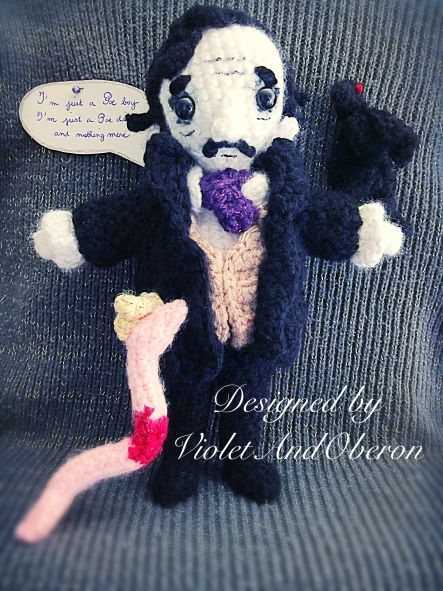
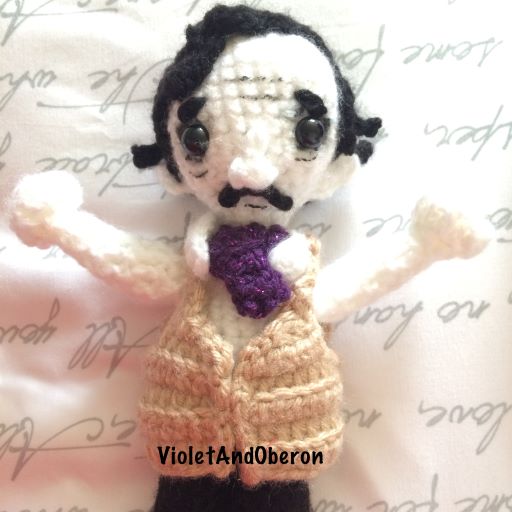
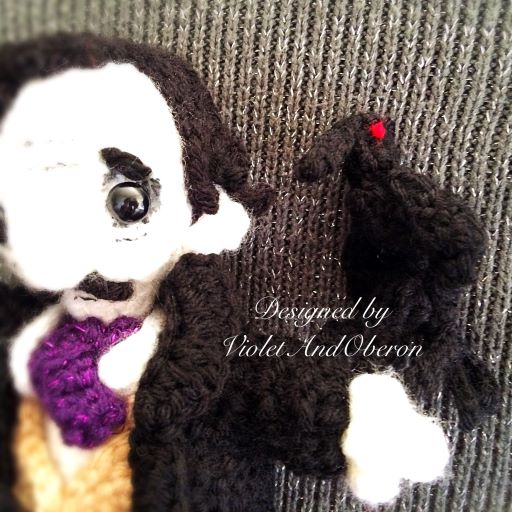
As far as I can remember, I have always loved Edgar Allan Poe. I am particularly fond of The Raven and The Conqueror Worm. Edgar Allan Poe had such a powerful way of expressing despair bordering on madness while pondering the human condition that it literally became inscribed in his face - his features showing profound sadness.
In this free crochet pattern, I tried to capture Edgar Allan Poe’s emotions and his major physical characteristics so that he would not look too generic. He is Edgar, not just any crochet doll. I still aimed at retaining a lot of cuteness despite the tragic of his face. I also wanted to honour his poems and crocheted a tiny raven and a crowned worm.
Please note that this is a work in progress to be completed in October 2022
Please note that this is not a toy suitable for children.
This pattern is for private use only. If posting it on social media, kindly mention that it was originally designed by VioletAndOberon.
Edgar
Unless mentioned otherwise, use 3 mm hook.
Head
With white yarn.
Ch 2.
R1 6 sc in first st of the chain (6)
R2 2 sc in each st around (12)
R3 Repeat sc in the next st, 2 sc in the next st (18)
R4 Repeat sc in the next 2 st, 2 sc in the next st (24)
R5 sc in each st around (24)
R6 Repeat sc in the next 3 st, 2 sc in the next st (30)
R7-12 sc in each st around (30)
R13 Repeat sc in the next 3 st, sc2tog (24)
R14 Repeat sc in the next 2 st, sc2tog (18)
Place the safety eyes between row 10 and 11.
R15 Repeat sc in the next st, sc2tog (6)
R16-20 sc in each st around (6)
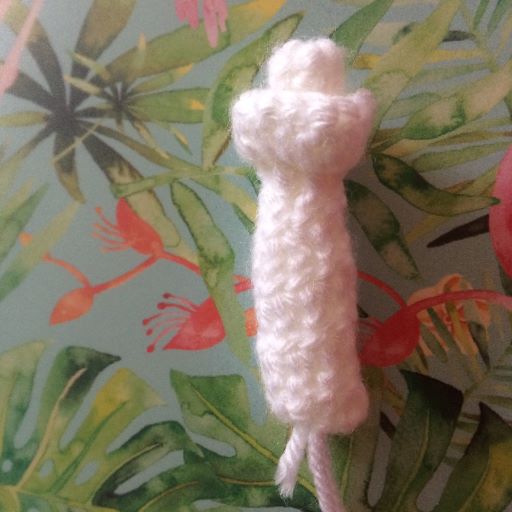
Torso and belly
With white yarn
R1 2 sc in each st around (12)
R2 Repeat sc in the next st, 2 sc in the next st (18)
R3 sc in each st around (18)
R4 Repeat sc in the next 2 st, 2 sc in the next st
R5-6 sc in each st around
R7 Repeat sc in the next 3 st, 2 sc in the next st
R8-10 sc in each st around
Switch to black yarn.
R11-13 sc in each st around
R14-16 repeat sc2tog. Finish off and weave in the tail.
Legs
With 3 mm hook.
With black yarn.
Make two.
Ch 2.
R1 6 sc in first st of chain
R2 2 sc in each st around (12)
R3-5 sc in each st around (12)
R6 sc2tog, sc in the next 10 st (11)
R7 sc in each st around (11)
R8 sc2tog, sc in the next 9 st (10)
R9 sc in each st around (10)
R10 sc2tog, sc in the next 8 st (9)
R11 sc in each st around (9)
R12 sc2tog, sc in the next 7 st (8)
R13 sc in each st around (8)
R14 sc2tog, sc in the next 6 st (7)
R15 sc in the next 3 st, ch 1, turn
R16 2 sc in the 1st st, sc in the next st, 2 sc in the next st, ch 1, turn
R17 sc in those 5 st
Foot
2 sc along the side downward
Then sc2tog, sc, sc2tog
2 sc along the side upward
Then sc,sc2tog, sc2tog
Next step
sc-BLO in each st around
Fold along the length and join by sewing under the foot.
Arms
With white yarn.
Ch 2.
R1 4 sc in first st of the chain
R2 Repeat 2 sc in the next st, sc in the next st
R3-4 sc in each st around
R5 ch 2. We are switching to dc instead of sc - 2 dc in in the next st then dc in each st around
R6 2 dc in in the next st then dc in each st around
R7 2 dc in in the next st then dc in each st around
R8-9 dc in each st around
Wait that you have finished the waistcoat to make sure that you are positioning the arms correctly before sewing them onto the body.
Cuffs
Use 2.5 mm hook.
With white yarn.
R1 insert your hook at R4 of the arm, ss, then sc all around
R2 dc in each st around
Shirt collar
With white yarn.
Use 3 mm hook.
R1 insert your hook in the middle of the torso at the basis of the neck, ss, then sc all around
R2 ch 3. 1 tr in in the same st, 2 tr in the next st, 1 tr and 1 dc in the next st, then repeat 2 dc in the next st, 1 dc in the next st, then for the last 3 st do 1 tr and 1 dc in the next st, 2 tr in the next st, 2 tr in the next st.
Necktie
Use 2 mm hook.
With purple yarn.
ch 30 plus 2, then dc 30.
Moustache
Use 2 mm hook.
ch 8 plus one, then sc 8.
Nose
Use 2 mm hook.
Ch 4, then ss 2, then sc 1 - if necessary sc again. Those last 2 sc should be the nostrils of your nose.
Sew nose and moustache on face.
Hair
You may choose to simply sew threads of yarn.
You can also create strands of hair to sew on.
ch 6, then ss all along. Use the tail to sew on head.
Well done for finishing the head and body of little Edgar!
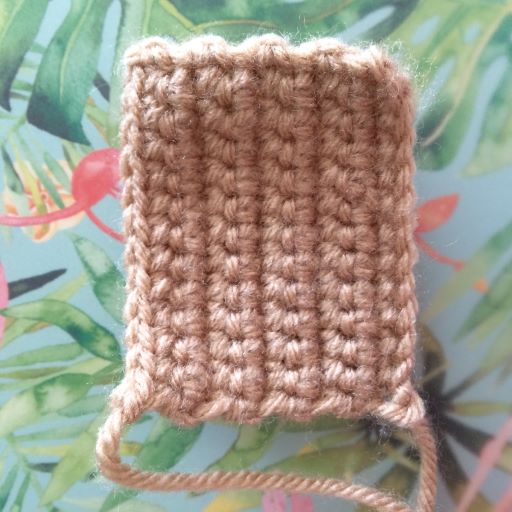
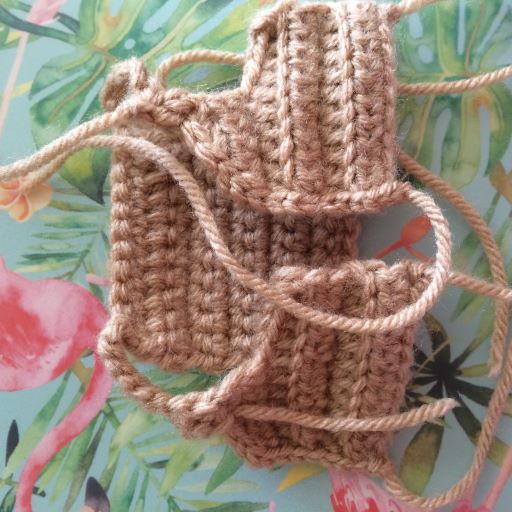
Waistcoat
The waistcoat is made of a back panel and two front panels.
with 3 mm hook.
With beige yarn.
Back panel
ch 13
R1-8 sc in the next 12 st, ch1, turn.
R9 sc in the next 12 st. Finish off.
Front panels
ch 11
R1 hdc in the next 10 st, ch1, turn
R2-4 hdc-BLO, c1, turn
R5 hdc in the next 5 st, ch1, turn
R6 hdc in the next 2 st, ss in the next 3 st
Then ss downwards all along the front of the panel (not the bottom). Fasten off.
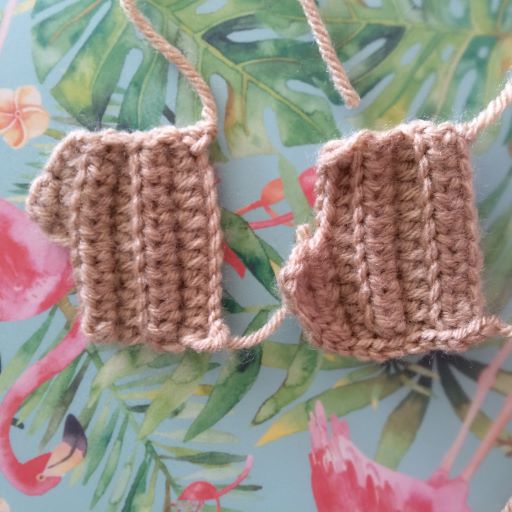
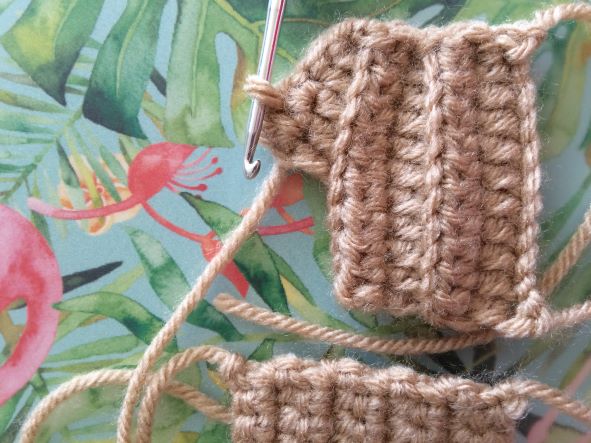
To assemble the waistcoat, you are going to start from the pointy part of the top of the right front panel. The chains will be the part sitting on the shoulders.
R7 At the top of the front right panel, insert hook, ss, ch2, dc, ch 7, dc 1 in the back panel then dc in the 9 next stitches, ch7, dc into the front left panel, ch 2, ss.
R8 optional, for a more finished look, sc all along the top edges and sc2tog at the beginning centre and end of the back panel.
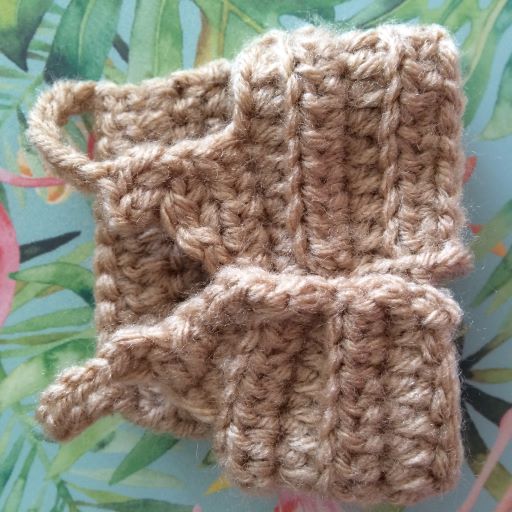
I chose to put the waistcoat on and to sew the two front panels together.
Coat
Main part of the coat
ch 25
R1 skip first ch from the hook. sc in the next 24 stitches. Ch1 turn.
R2-8 skip first ch from the hook. hdc in the next 24 stitches. Ch1 turn.
R9 hdc in the next 3 stitches. Ch1 turn.
R10-11 sc in the next 3 stitches.
R 12 miss the first stitch. sc in the next 2 stitches. Ch1 turn.
R13 sc in the 2 stitches.
Fasten off and weave in the ends.
Top left and right corners to create armholes
Starting from the top corner on the other side, reproduce R9 to R13 like so:
R9 hdc in the next 3 stitches. Ch1 turn.
R10-11 sc in the next 3 stitches.
R 12 miss the first stitch. sc in the next 2 stitches. Ch1 turn.
R13 sc in the 2 stitches.
Fasten off and weave in the ends.
Top centre to create armholes
Now you will work the central part of the back of the coat. Skip the first 7 stitches from R9 (three stitches are already worked and four are not already worked).
R1 insert hook, ss and ch1. Starting from the same stitch, sc 10.
R2 sc2tog, sc in the next 6 st, sc2tog, ch 1, turn.
R3 sc2tog, sc in the next 4 st, sc2tog, ch 1, turn.
R4 sc2tog, sc in the next 2 st, sc2tog.
Finish off and weave in the ends.
Sleeves
Make two.
ch 12. ss to join.
R1-3 sc in each stitch around.
R4-7 hdc in each stitch around.
R8 sc in each st around, ch 1, turn,
R9 sc in the next 8 st, ch 1, turn.
R10 sc2tog, sc in the next 4 st, sc2tog, ch 1, turn.
R11 sc2tog, sc in the next 2 st, sc2tog, ch 1, turn.
R12 sc in the 4 stitches.
Fasten off. Use tail to sleeve onto the armhole. Left, top, and right edge ridge
To create the edge ridge, slip stitch all along starting from the bottom right corner, continuing onto the top, down to the bottom left corner.
Do no slip stitch along the bottom of the coat.
Lapels
R1 sc all along.
In order for the lapels to look like they are folded as a mirror image, you will do R2 in the BLO for the left lapel, and FLO for the right lapel. You are more than welcome to proceed differently.
R2 starting from the sc at the top of the coat. 2 dc in the first stitch, triple in the next stitch, ch 3, ss in next stitch, ss in next stitch, ch 3, triple in next stitch, dc in next 2 stitches, hdc in the remaining stitches.
The Conqueror Worm with his crown
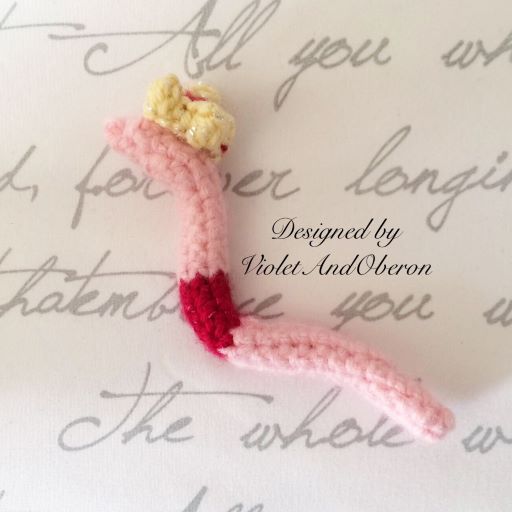
Feel free to add or remove rows to change its shape, or to make it only pink.
Please note that this is not a toy suitable for children.
Feel free to add a piece of wire before fastening off so that you can bend the worm in your favorite way next to the Edgar Allan Poe crochet doll.
We start from the tail in pink yarn.
ch 2.
R1 6 sc in first st of the chain
R2-5 sc in each stitch around
R6 2 sc in first st, sc in the next 3 st, 2 sc in the next st, sc in the next st
R7-9 sc in each stitch around
Switch color to red
R10-14 sc in each stitch around
Switch color to pink
R15 sc in each stitch around
R16 sc2tog, sc in remaining st
R17 2 sc in next st, sc in next 2 st, 2 sc in next st, sc in remaining st
R18 2 sc in next st, sc in remaining st
R19 sc2tog, sc, sc2tog, sc in remaining st
R20-22 sc2tog until finish off
Crown
With 2.5 mm hook and yellow yarn.
ch 13
R1 12 sc, ch 1, turn
R2 sc in first st, puff st in next st, sc in next 2 st, puff st in next st, sc in next 2 st, puff st in next st, sc in remaining st.
Sew to join.
Optional: make a little cap at the center of the crown for a more regal look
With red yarn
ch 2
R1 sc 4 in first st of the chain. Fasten off. Sew it inside the crown.
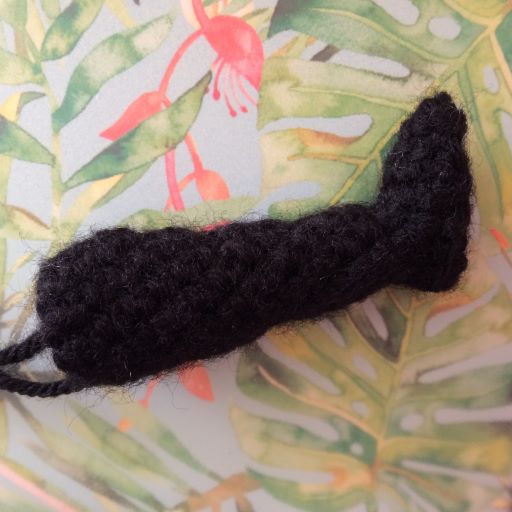
The Raven
The raven is designed with its body not completely sewed at the bottom so that it can be put on top of a pencil or anything else that you might wish to put next to your little Edgar Allan Poe amigurumi doll to create a scene.
I chose not to stuff the raven because it is such a small piece but you are welcome to add a bit of stuffing or leftover bits of yarn to make it a bit heavier and puffier.
Please note that this is not a toy suitable for children.
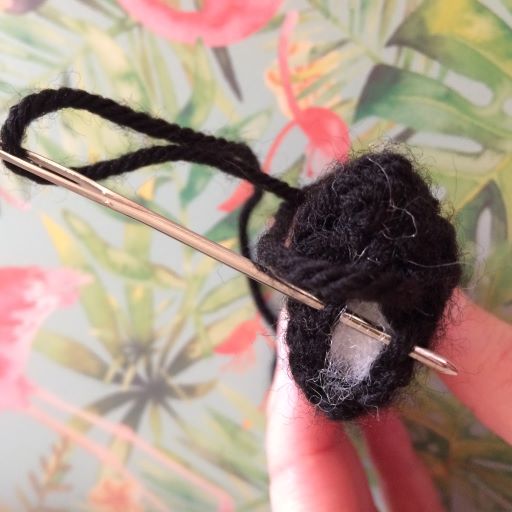
Head of the raven
With 2.5 mm hook.
With black yarn.
Ch 2
R1 4 sc in first st of the chain (4)
R2 2 sc in each st (8)
R3 sc in each st around (8)
R4 2 sc in first st then sc in remaining st (9)
R5 sc2tog until hole is small enough to close
Keep the tail to sew the head onto the body. You may need to gently squeeze it to shape it.
Body of the raven
ch 2
R1 6 sc in first st of the chain (6)
R2 ss to join, ch 2. 2 dc in first st, then 4 dc in the next st, then 2 dc in last st (8)
R3 This is the tail of the body onto which we will sew on the tail feathers later. In this row we are not crocheting all around. Ch 2, turn, dc in the next 3 st (3)
R4 ch 2, turn, dc in the next 3 st (3)
R5 ch 1, sc-BLO all around the edges of the hole (if too hard, ss, or simply don’t do R5). Fasten off.
Fold it and gently squeeze it along the length, with the hole underneath, and the long part made of the two rows of 3 dc as the tail.
Wings of the raven
ch 3
R1 2 sc. ch 1, turn (2)
R2 2 sc in first st, 1 sc in remaining st (3)
R3 ch 2, turn. dc in each st (3)
R4 ch 1, turn. 3sc (3)
R5 c h1, turn. sc2tog in first st, sc in the next st (2)
R6 ch 1, turn. sc2tog (1)
R7 ch 1, ss, fasten off.
Beak of the raven
If you prefer just make a beak out of felt, paper, cardboard, otherwise you may wish to try the following.
Ch 6
R1 5 sc
R2 5 sc-BLO
Fasten off, fold the stripe, and sew along the length.
Eyes
Since the raven is so small, I did not use safety eyes, I simply stitched on some red yarn.
I hope you enjoyed this pattern and that your little Edgar Allan Poe, his worm, and his raven will find their place on the shelves of your library.